Automatically translated from Dutch. Some wording may be inaccurate.
The employee planboard shows daily staffing per client or request over three weeks. Each date cell shows the number of scheduled employees. Select a cell to display the detailed staffing list for that client or request on that date below the board. You can create or edit placements using matching or dragging, and edit day planning directly.
A client appears automatically when it has placements in the displayed period. To show a request, open its details and set Plan board to Show as a separate row. The request is shown only if its period overlaps the displayed planboard period.
Selection
The current week is shown first by default, with today's column heading highlighted in red. Use From week to move backwards or forwards a week, or select another week with the middle button.
Use Client name to filter by all or part of a client's name.
The affiliate selector lets you filter either clients and requests (the default) OR employees by affiliate.
When filtering by the client's affiliate:
•Clients are shown if they belong to a selected affiliate.
•Requests are shown if their clients belong to a selected affiliate, they are set to show on the planboard, and their periods overlap the displayed period.
•Employee counts also include employees from affiliates that are not selected.
When filtering by the employee's affiliate:
•Clients are shown if they have placements during the displayed period with employees from the selected affiliates.
•Requests are shown if set to show on the planboard and their periods overlap the displayed period.
•Employee counts are filtered by the selected affiliates.
•A day column may therefore show less than the total staffing because employees from other affiliates are not counted.
Clients and requests with day columns
|
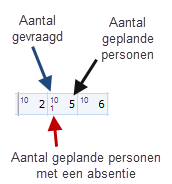
The upper part of the screen has client and request details on the left and day columns on the right. Day cells show: •The number of scheduled employees on the right •The number of employees with an absence at the bottom left •The number of people requested at the top left, if the row is a request.
In this example, the middle cell has five placed employees, one of whom has an absence but is still scheduled. Ten people are requested, so another five must be scheduled. |
Choose client and request columns with the list definition button at the top right. Adding more columns moves the day columns further to the right.
Click an employee in the lower list to mark every day cell containing that employee with a grey square. This shows how the person is scheduled across clients and requests.
Double-click a request row to open request details, or a client row to open client details. The following buttons appear directly below the clients and requests:
•Client
Opens client details for the selected row in the upper list.
•Request
Opens request details for the selected row. This works only if the row represents a request.
•Request per day
Opens the screen for entering the number of people requested each day. This works only if the selected row represents a request.
Totals below the day columns show scheduled and requested people, with requested numbers at the top left.
Scheduled employees
The lower list shows the employees for the selected day cell and client or request. If the cell shows '4' for placed employees, selecting it displays four rows below.
Choose employee columns with the list definition button at the bottom left. These can include accommodation placement and car use on the selected day in the planboard (unlike the regular employee planlist, which shows other planning details as of the system date).
The Day planning column is fixed. It looks and works like the corresponding column in the day planner: blue means the day is scheduled. Double-click to unschedule the day and update the count above immediately. Use the checkbox below to show the placement again. Coloured corners indicate duplicate planning and/or absences; hover over them for details.
Hover over a placement's start or end date to see all the employee's placements for the next six weeks.
This list offers the same options for creating, editing and deleting placements as the regular planlist. The Placements button works as in the employee planlist. The same applies to Employee, Documents, SMS and Archive. The Absences button lets you enter or edit an absence, including for several employees at once.
The following buttons appear below the scheduled employees:
•Place by matching
Shows suitable available employees to place with the selected client or request from the selected date.
First select the client or request and the date from which you want to place employees. Click Place by matching to open Select employee, filtered to candidates available on that date. For a request, the selection also considers required discipline functions, certificates and other criteria. After you select employees, a placement is created with the selected date and client or request details already filled in.
•Day planner
Opens a screen containing the day planner for editing day planning for all placements on the selected date.
•Including unplanned job placements on this day
Also shows placements for the client or request whose overall period includes the selected date but which have no day planning on that day.
You can edit placements by dragging one or more employees from the lower list into day columns on the planboard.
Please note: this changes the placement period (start and end dates). If you use day planning, this option is less relevant because placements are likely to remain open for longer.
Set an end date by dragging
For example, if employees will stop working at client A on date X, enter their end dates as follows:
•Click today's cell for client A to show the current employees in the lower list.
•Select the employees and drag them to the column heading for date X.
•The Edit placements screen opens with end date X filled in. Click OK to save; the numbers on the planboard are then updated.
Create a placement by dragging
If employees move from client A to client B on date X:
•Click the cell for client A on their last day at client A to show those employees in the lower list.
•Select the employees and drag them to client B's row, into the cell for date X.
•Where applicable, Regelneef asks whether to set an end date for the existing placements. Click Yes.
•The New placements screen opens with start date X and the client details filled in. For a request, further details are copied directly into the placement.
•Click OK to save; the numbers on the planboard are then updated.